

Audio is the foundation of any show, but video is the engine for multi-platform growth. In 2026, platforms like TikTok, YouTube, and Spotify Video have made the visual component of your show non-negotiable. If you want your clips to go viral, you must transition your focus to the specialized Video Podcast Equipment required to deliver a professional broadcast.
Adding a visual layer is more complex than just turning on your laptop webcam. You have to manage video resolution, frame rates, and three-point lighting, all while ensuring your audio stays perfectly synchronized with your lips. This guide is a complete, action-oriented blueprint. We review the essential video podcast equipment—including mirrorless cameras, key lights, and capture cards—and explain how to configure your room for professional depth. To make sure your audio matches your visual quality, start with our main guide on Starting a Podcast: The Ultimate Equipment Needed Checklist
1. The Camera: Selecting the Eyes of Your Video Podcast Equipment Setup
The most expensive component in your video podcast equipment inventory is the camera. Skip cheap webcams; your audience expects clean depth of field.
Why Mirrorless is the Professional Standard
Mirrorless cameras feature large sensors that capture more light and allow for a natural “blurry background” (bokeh). This professional look instantly separates your show from standard Zoom calls.
Top 3 Camera Recommendations for 2026
- The Overall Best: Sony ZV-E10 (or equivalent ZV-series model)
This camera is built specifically for content creators. It features flawless product-showcase autofocus and unlimited recording time without overheating, making it the premier choice for video podcast equipment setups. - The Premium Upgrade: Sony a6700
Offers gorgeous 4K resolution at 60 frames per second and superior low-light performance. - The Entry-Level Value: Elgato Facecam Pro
If you demand a webcam format, this is the only webcam capable of outputting native 4K at 60FPS. It is the easiest way to start without dealing with HDMI capture cards.
2. The Capture Card: Bridging the Camera to Your PC
If you choose a professional mirrorless camera, your video podcast equipment list must include an HDMI capture card.
How it Works
A camera cannot connect to a PC via a standard USB cable for video feeds. You must run an HDMI cable from the camera into a capture card (like the Elgato Cam Link 4K), which then plugs into your PC’s USB 3.0 port. Your computer will then recognize the mirrorless camera as a high-end webcam.
Why You Can’t Skip This
A dedicated capture card ensures your video feed remains stable and free of frame drops during long multi-hour recording sessions.
Processing 4K video feeds requires significant CPU overhead. Ensure your PC is optimized so your capture software doesn’t drop frames. See: How to Stop Antivirus From Dropping FPS
3. Studio Lighting: The True Visual Upgrade
A $1,000 camera will look like a cheap webcam if your lighting is poor. Conversely, a cheap webcam can look fantastic with professional lighting.
The Three-Point Lighting Rule
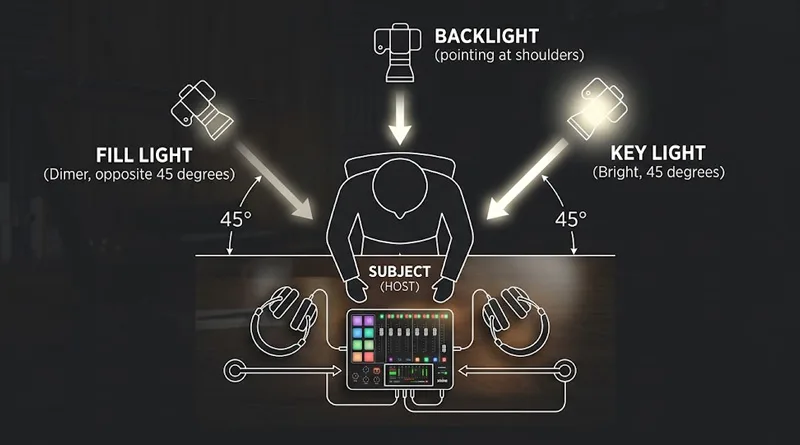
The most critical step in configuring your video podcast equipment is the placement of your lights.
- The Key Light (The Primary): Your main, brightest light. Position it at a 45-degree angle to your face to create natural shadows and dimension.
- The Fill Light (The Secondary): A softer, less intense light positioned opposite the Key Light. Its job is to gently fill in the shadows on the other side of your face.
- The Backlight (The Separator): Positioned behind you, pointing at your hair and shoulders. This creates a “halo” effect that physically separates you from your background, adding depth.
Recommended Studio Lights
- Top Pick: Elgato Key Light (or Key Light Air)
These LED panels connect directly to your Wi-Fi, allowing you to adjust brightness and color temperature from your desktop.
4. Audio Integration: Syncing Your Mic with the Camera
The ultimate rookie mistake in video podcasting is having your voice arrive a fraction of a second before your lips move.
- The Cause: High-resolution video takes longer for your PC to process than raw audio. This creates an “Audio Sync” delay.
- The Action Fix: In your recording software (such as OBS or Riverside.fm), you must set an “Audio Delay Offset” (usually between 100ms and 200ms) on your microphone track to hold the audio back until the video catches up.
Having the right microphone makes this synchronization process much easier. Check out our technical comparison: USB vs XLR Mic for Gaming and Streaming
5. Network Headroom for Live Streaming and Video Bitrates
If you are streaming your video podcast live, your network is under intense pressure.
- The Latency Bottleneck: Streaming 1080p video while running multi-track voice chat requires a massive amount of upstream bandwidth.
If your upload speed is too slow, your stream will buffer and drop frames, ruining your viewer experience. Verify your connection can handle the load: Does Upload Speed Affect Gaming and Streaming?
Conclusion: Build Your Visual Brand
Choosing the right video podcast equipment is about creating a visual identity that matches the quality of your audio. Start by prioritizing your lighting first, followed by a high-quality mirrorless camera and an Elgato capture card.
By implementing the three-point lighting rule and ensuring your audio offset is calibrated, you will deliver a broadcast-quality production that keeps viewers engaged across all social platforms. Protect your visual brand.
Check out camera compatibility lists on Elgato’s official website