
If you choose the professional XLR route, your starting a podcast equipment needed checklist must include an Audio Interface or a Dedicated Podcast Mixer. This device converts the analog signal from your microphone into digital data your computer can record. Understanding this part of the starting a podcast equipment needed setup is essential if you plan to host more than one person.
You do not need to spend thousands of dollars to sound like a professional, but you do need to make smart, compatible hardware choices. This guide is a complete, action-oriented blueprint. We break down the necessary hardware—from microphones and audio interfaces to headphones and software—and explain how to scale your setup from a simple solo broadcast to a multi-guest studio. If you are already familiar with high-end setups from our guide to the Best Gaming Mic, you already have a head start.
The Core Microphone: Starting a Podcast Equipment Needed Essentials
The single most important decision in your starting a podcast equipment needed plan is the microphone. This is where your signal chain begins.
Dynamic vs. Condenser Mics
- Condenser Microphones: Highly sensitive and excellent for capturing detail. However, they pick up everything—your room’s echo, your PC fans, and traffic outside. Avoid these unless you have a fully soundproofed studio.
- Dynamic Microphones: The gold standard for podcasting. They are less sensitive and require you to speak close to the capsule, which naturally ignores background noise and room echo.
The USB vs. XLR Decision
- USB Mics (Solo Creators): If you are recording alone, a USB mic is the best budget-friendly choice. It plugs directly into your PC, requiring no extra hardware.
- XLR Mics (Multi-Person Shows): If you plan to have guests in the same room, you must use XLR mics. Computers struggle to process multiple USB microphones simultaneously.
To understand the cost and performance differences before buying, read our full comparison: USB vs XLR Mic for Gaming and Streaming [LINK TO USB VS XLR CLUSTER].
2. The Audio Interface: The Brain of the Studio
If you choose the professional XLR route, your starting a podcast equipment needed checklist must include an Audio Interface or a Dedicated Podcast Mixer. This device converts the analog signal from your microphone into digital data your computer can record.
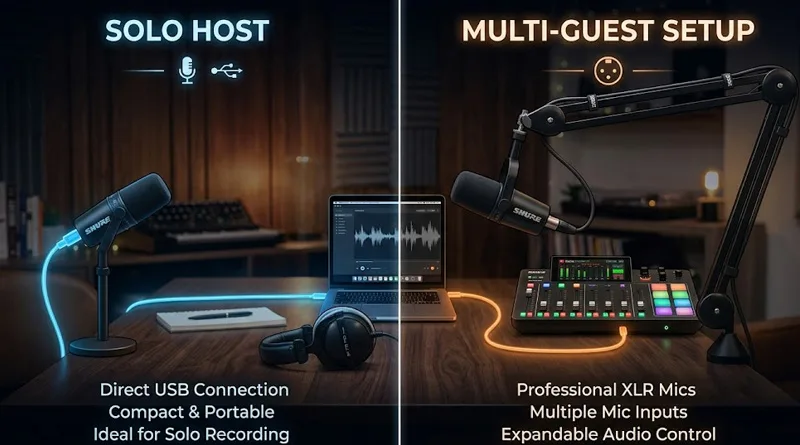
For Solo and Duo Podcasters: The Audio Interface
A simple 2-channel interface (like the Focusrite Scarlett 2i2 or Elgato Wave XLR) is perfect. It provides clean preamp power to your microphones and connects via USB to your laptop.
For Multi-Guest and Professional Studios: The Podcast Mixer
Devices like the Rodecaster Pro II or Tascam Mixcast are all-in-one production studios. They allow you to plug in up to four XLR microphones, connect phone calls via Bluetooth (with automatic echo cancellation), and play sound effects using physical pads. This is the ultimate centerpiece for a high-end show.
3. Headphones: Monitoring and Preventing Echo
You cannot record a professional podcast without headphones. Period.
Why Headphones are Mandatory
If you play your guest’s voice through external speakers, your microphone will pick up that sound and create a distracting echo loop. Headphones isolate the audio, keeping your track clean.
What to Look For: Closed-Back Design
Always choose Closed-Back Headphones (like the Audio-Technica ATH-M50x or Beyerdynamic DT 770 Pro). Unlike open-back models, closed-back headphones have solid earcups that prevent sound from “leaking” out and being picked up by your sensitive microphone.
4. Accessories: Isolating and Positioning Your Mic
The best microphone in the world will sound terrible if it is sitting on a flat desk picking up the vibrations of your computer or hands. Part of your starting a podcast equipment needed assembly is isolating and positioning your microphone correctly so it doesn’t pick up desktop thumps.”
The Boom Arm
A boom arm lifts the microphone off your desk and positions it 2-3 inches from your mouth. This allows you to lower your input volume (gain), which naturally mutes background noise.
- Action Plan: Always budget for a sturdy arm that can handle the weight of your mic. Learn how to set up your desk correctly in our Gaming Mic Boom Arm Setup Guide [LINK TO BOOM ARM CLUSTER].
Shock Mounts and Pop Filters
- Shock Mount: Suspends the microphone in elastic bands, absorbing the thumps and vibrations of your desk.
- Pop Filter: A small foam or mesh screen placed in front of the mic. It disperses the air blasts from “P” and “B” sounds, preventing harsh “pops” in your recording.
5. Acoustic Treatment: Essential Starting a Podcast Equipment Needed Environment
Many creators focus entirely on the hardware list of starting a podcast equipment needed resources, but ignore the room itself. A $50 microphone in a room with rugs and blankets will sound better than a $400 microphone in an empty room with bare drywall and hardwood floors.
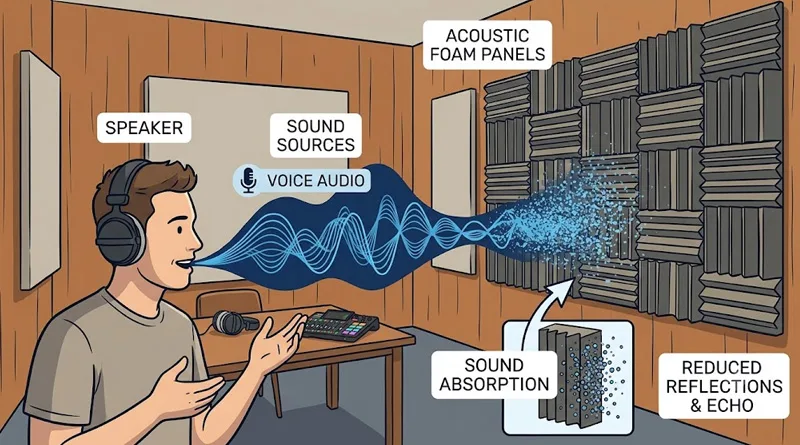
Simple DIY Acoustic Fixes
- Add a large area rug to hardwood floors.
- Hang heavy curtains over windows.
- Place bookshelves filled with books behind your recording position to scatter soundwaves and prevent echo.
6. Software: Recording and Editing Your Masterpiece
Once your physical hardware is set up, you need a Digital Audio Workstation (DAW) to capture and edit the tracks.
- Audacity (Free/Open Source): Excellent for beginners. Simple interface, powerful basic editing tools, and completely free for Windows and Mac.
- Reaper (Budget Pro): A highly stable, professional-grade DAW that is free to try and very cheap to license. It is the preferred choice for advanced podcast editors.
- Riverside.fm / SquadCast (Remote Recording): If you are recording guests over the internet, do not rely on Zoom or Discord. These platforms compress the audio. Use a dedicated remote recording platform that records high-quality local audio on both ends and uploads it automatically.
Conclusion: The Actionable Checklist to Launch
Your starting a podcast equipment needed plan should scale with your ambitions. Don’t let the fear of expensive hardware stop you from starting. Having a solid starting a podcast equipment needed strategy ensures you buy only what is necessary to deliver the clean, authoritative sound your audience deserves.
- The Solo Budget Setup: Buy a high-quality USB microphone (like the Elgato Wave:3) and a pair of budget closed-back headphones.
- The Pro Studio Setup: Invest in a Rodecaster Pro II mixer, two dynamic XLR microphones (like the Shure MV7), sturdy boom arms, and professional monitoring headphones.
Prioritize your microphone first, control your room’s echo, and use high-quality software to deliver the clean, authoritative sound your audience deserves. Your voice is your brand—protect it.
Check out the official Transistor.fm guide on how to submit a podcast to Spotify and Apple]