So, you’ve just unboxed your brand-new Logitech mouse, or perhaps you’re trying to reconnect an old favorite to a new computer. You’re ready to enjoy that smooth, cable-free experience, but you’re met with a common question: how to connect a Logitech wireless mouse? While it’s usually a straightforward process, Logitech uses a few different wireless technologies across its product line. Knowing which one you have and the correct steps to follow is the key to a quick and painless setup.
Logitech has built a reputation for creating some of the best wireless mouse options on the market. But whether you have a gaming or productivity model, learning how to connect a Logitech wireless mouse can sometimes be tricky. The connection process can vary slightly depending on the technology, but don’t worry—it’s all very simple once you know what to look for.
This comprehensive guide will provide simple, step-by-step instructions on how to connect a Logitech wireless mouse, covering all of their modern connection methods.
If you have a USB dongle with a green or orange star logo, this section will show you how to connect a Logitech wireless mouse using the receiver.
Step 1: Identify Your Connection Type
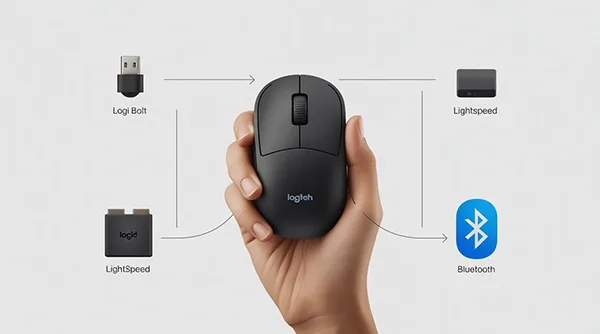
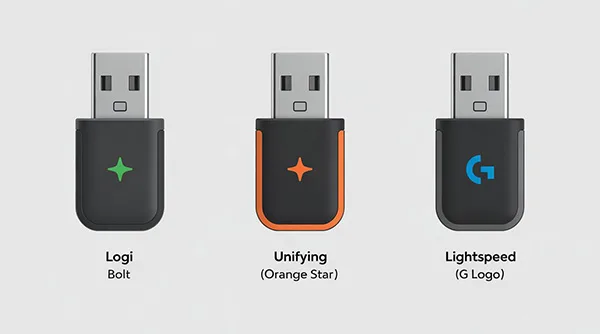
Before you can connect your mouse, you need to know what kind of wireless technology it uses. There are three main types for modern Logitech mice. Look at the USB receiver (the “dongle”) that came with your mouse.
- Logi Bolt Receiver: This is Logitech’s newest standard for non-gaming peripherals. The USB dongle will have a greenish-yellow star logo on it. Logi Bolt is designed for an ultra-secure and stable connection, even in crowded office environments.
- Unifying Receiver: This was Logitech’s long-standing receiver for many years. The dongle will have a small, simple orange star logo on it. It’s a versatile receiver that can connect up to six compatible Logitech devices at once.
- LIGHTSPEED Receiver: This is the high-performance receiver for Logitech G gaming mice. It will usually be branded with the Logitech G logo. LIGHTSPEED is engineered for pro-grade, 1ms low-latency performance that’s crucial for competitive gaming.
- Bluetooth: Many Logitech mice can also connect directly to your computer using Bluetooth, without needing a USB receiver at all. This is a great option for laptops and tablets where USB ports are limited.
Once you’ve identified your receiver type, you can jump to the correct section below.
Step 2 (Option A): How to Connect a Logitech Wireless Mouse via Logi Bolt or Unifying Receiver
For 95% of users, connecting with a Logi Bolt or Unifying receiver is a simple plug-and-play process.
- Ensure Your Mouse is Powered On: Make sure your mouse has fresh batteries or is charged. Turn on the power switch, which is usually located on the bottom of the mouse.
- Plug in the USB Receiver: Take the Logi Bolt or Unifying receiver that came in the box and plug it into a free USB-A port on your computer.
- Wait for Automatic Pairing: In most cases, the mouse is pre-paired to the receiver it was packaged with. Within a few seconds, Windows or macOS will automatically install the necessary drivers, and your mouse cursor should begin to move. It’s that simple!
What if It Doesn’t Connect Automatically? (Using Logi Options+ Software)
If your cursor isn’t moving, you’ll need to use Logitech’s software. This is also the solution for how to connect a Logitech wireless mouse to a receiver it wasn’t originally paired with (e.g., connecting an old mouse to a new Logi Bolt receiver).
- Download and Install Logi Options+: Go to the official Logitech Software page and download the Logi Options+ application. This is an essential tool for any modern Logitech productivity device.
- Open Logi Options+: Launch the software.
- Add a New Device: In the main window, click the “Add Device” button.
- Select Your Receiver Type: The software will ask if you’re connecting via a Logi Bolt or Unifying receiver. Select the correct one.
- Follow the On-Screen Prompts: The software will guide you through the process of putting your mouse into pairing mode (usually by turning it off and on again) so the receiver can find and connect to it.
Once paired through the software, your mouse will be permanently linked to that receiver.
Step 2 (Option B): How to Connect a Logitech Wireless Mouse via LIGHTSPEED Receiver
Connecting a Logitech G gaming mouse is just as simple as the plug-and-play method above.
- Ensure Your Mouse is Powered On: Make sure your gaming mouse is charged and the power switch on the bottom is turned on.
- Plug in the LIGHTSPEED Receiver: Plug the receiver directly into a high-speed USB-A port on your computer. For best performance, it’s recommended to use a port on the front of your PC or the included USB extension cable to get the receiver as close to your mousepad as possible, minimizing any potential for signal interference.
- Automatic Pairing: Your gaming mouse is pre-paired to its LIGHTSPEED receiver. It should connect instantly, and you’ll be ready to game.
Managing Your Gaming Mouse with G HUB Software
To get the most out of your gaming mouse, you’ll want to use the Logitech G HUB software. This allows you to customize DPI settings, change RGB lighting, and create custom button profiles. If you ever have connection issues, this software can also help you re-pair your device.
- Download and Install G HUB: Get the software from the official Logitech G HUB page.
- Manage Devices: Once installed, G HUB will automatically detect your connected LIGHTSPEED devices. If you ever need to re-pair a mouse to its receiver, you can access the “Device Pairing Tool” within the G HUB settings.
Step 2 (Option C): How to Connect a Logitech Wireless Mouse via Bluetooth
Connecting via Bluetooth is a great, dongle-free option, especially for laptops and other portable devices. For users who want a dongle-free experience, learning how to connect a Logitech wireless mouse via Bluetooth is an essential skill.
- Put Your Mouse in Pairing Mode: First, ensure your mouse is powered on. Then, look for a dedicated Bluetooth pairing button or an “Easy-Switch” button on the bottom of the mouse. Press and hold this button for about 3-5 seconds. You should see an LED on the mouse begin to blink rapidly, which indicates it’s in pairing mode.
- Open Bluetooth Settings on Your Computer:
- On Windows 11: Go to Settings > Bluetooth & devices.
- On macOS: Go to System Settings > Bluetooth.
- Add a New Device:
- On Windows: Click the “Add device” button and then select “Bluetooth.”
- On Mac: Your computer will automatically scan for new devices.
- Select Your Mouse: Your computer will begin searching for available Bluetooth devices. Wait for your Logitech mouse (e.g., “MX Master 3S” or “Logi Pebble Mouse 2”) to appear in the list. Click on its name to initiate the connection.
- Confirm the Connection: Once you click the name, the devices will pair, and the rapidly blinking light on your mouse will turn solid for a few seconds. Your mouse is now connected and ready to use.
Conclusion: Troubleshooting and When to Upgrade
Learning how to connect a Logitech wireless mouse is a simple process once you identify your connection type. For most users with a 2.4GHz receiver, it’s a matter of plugging it in and letting it pair automatically. For Bluetooth, it’s a quick trip to your settings menu.
If you have followed all these steps and are still experiencing issues, it could be a sign of a hardware problem. If the mouse is old and has been used heavily, the internal components may have simply worn out. If you’ve decided it’s time for an upgrade to a newer, more reliable model, our detailed guide to the best Logitech wireless mouse can help you find the perfect replacement with the latest technology.