
You’ve followed the reviews, compared the specs, and finally invested in the Best Gaming Mic for your setup. But if that expensive microphone is still sitting on the plastic tripod that came in the box, you are only hearing 50% of its potential. A professional Gaming Mic Boom Arm Setup is not just about looking like a pro streamer; it is a technical necessity for isolating vibrations, clearing desk space, and—most importantly—saving your posture.
In 2026, the “buying journey” for audio gear has shifted. Users are realizing that hardware is only as good as its implementation. This guide provides an actionable blueprint for mastering your Gaming Mic Boom Arm Setup. We will cover everything from cable management and tension calibration to the “Secret Dead Zone” trick that silences loud mechanical keyboards.
1. Choosing Your Style: Low Profile vs. Traditional High-Reach
Before you begin your Gaming Mic Boom Arm Setup, you must decide which physical “lane” your arm will occupy.
Traditional Scissor Arms
These are the classic “Radio Station” style arms that reach over the top of your monitors.
- Pro: Excellent for keeping the mic completely out of your peripheral vision.
- Con: Can look cluttered on camera and may interfere with top-mounted webcams.
Low-Profile (LP) Arms
The most popular trend in 2026 Gaming Mic Boom Arm Setup history. These arms sit 2-3 inches above the desk and “sneak” under your monitors.
- Pro: Ultra-clean aesthetic, doesn’t block your face on camera, and feels more natural for desk-bound players.
- Con: Requires a clear path across your desk surface, which can be difficult for cluttered setups.
2. Positioning for Silence: The Cardioid Dead Zone Trick
The #1 complaint from teammates in Discord is hearing your keyboard more than your voice. A proper Gaming Mic Boom Arm Setup solves this through physics.
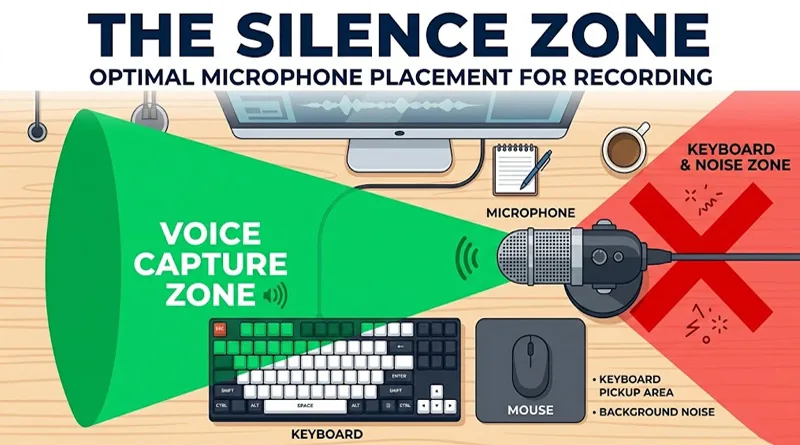
Most gaming microphones use a Cardioid pickup pattern, which is heart-shaped. It captures sound from the front and is “dead” (silent) at the exact rear.
- The Action: Mount your boom arm so the back of the microphone is pointing directly at your keyboard.
- The Result: By placing the keyboard in the “Dead Zone” of your Gaming Mic Boom Arm Setup, you can continue using clicky mechanical switches without ruining your audio feed.
3. Ergonomics: Why Your Setup is a Health Choice
We often talk about the “look” of a stream, but a Gaming Mic Boom Arm Setup is a pillar of long-term health. If your mic is too far away, you will instinctively “hunch” forward to reach it.
The “Leaning” Trap
Hunching forward to speak into a desk-mounted mic leads to “Gamer Neck” and chronic upper back pain.
- Pro Tip: Your Gaming Mic Boom Arm Setup should allow you to sit perfectly flush against your chair’s lumbar support. Bring the mic to your mouth; never bring your mouth to the mic.
Proper posture is the foundation of competitive longevity. See our 7 rules for a pain-free life in Weight Gaming: The Ultimate Ergonomics Guide.
4. Cable Management and Tension Calibration
Nothing ruins a Gaming Mic Boom Arm Setup faster than a “rats nest” of hanging wires or an arm that won’t stay in place.
Internal vs. External Channels
Modern premium arms (like the Blue Compass or Elgato Wave Arm) feature internal cable channels.
- Action: If your arm doesn’t have these, use Velcro ties (never zip ties) to secure the cable along the top of the arm segments. Leave a “slack loop” at every joint so the arm can move freely without tugging the wire.
Calibrating the “Sag”
If you are using a heavy XLR mic (see our USB vs XLR Mic Comparison), your boom arm might start to droop.
- Fix: Locate the tension screws at the base and the elbow of the arm. Tighten them until the arm stays perfectly still, but still allows you to push it away with one finger when you’re done gaming.
5. Vibration Isolation: The Shock Mount Factor
Even with a perfect Gaming Mic Boom Arm Setup, “desk thumps” can travel through the metal arm and into the mic capsule.
- The Solution: Ensure your boom arm setup includes a Shock Mount. This is a cradle of elastic bands that suspends the mic in mid-air. It acts as the “suspension” for your microphone, absorbing the impact when you accidentally slam your desk after a loss.
- The Pop Filter: Always attach your pop filter to the boom arm itself, not the mic. This ensures that when you move the arm, the filter stays in the perfect 2-inch gap between your mouth and the capsule.
Conclusion: Take Action on Your Audio Identity
Mastering your Gaming Mic Boom Arm Setup is the final step in moving from a casual player to a professional creator. It rewards you with better sound, a cleaner desk, and a healthier spine. In 2026, where every frame and every frequency is scrutinized by viewers and AI search engines alike, don’t let a poor mounting choice hold you back.
Set up your “Silence Zone,” calibrate your tension, and stand (or sit) tall. Your audience will hear the difference immediately.