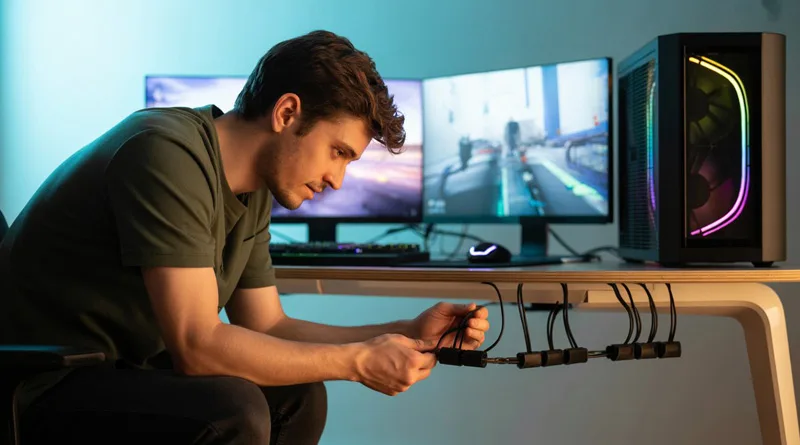
There’s no feeling quite like powering on a new high-end gaming PC, seeing the RGB lights pulse to life, and loading into your favorite game. But as you look down from your glorious monitor, you see it: the dreaded “rat’s nest.” A chaotic tangle of black cables for your power, monitor, keyboard, mouse, and microphone that completely ruins the aesthetic of your otherwise perfect battle station. This guide is here to fix that.
Proper gaming desk cable management is the final, crucial step that separates an amateur setup from a truly professional one. It’s not just about looks; a clean setup is easier to maintain, promotes better airflow, and simply feels more organized and stress-free.
In this comprehensive guide, we’ll walk you through the essential tools and provide a step-by-step plan to transform your desk from chaotic to clean.
(Affiliate Disclosure: This post contains affiliate links. As an Amazon Associate, I earn from qualifying purchases at no extra cost to you. This helps support the site!)
Table of Contents
Why Bother with Gaming Desk Cable Management?
Before we grab our tools, let’s quickly cover why this process is so important. It’s more than just a vanity project.
- Superior Aesthetics: This is the most obvious benefit. A clean, organized desk looks professional and impressive. It allows your carefully chosen components to be the stars of the show, not the mess of wires connecting them.
- Improved Airflow & Cooling: Cables bunched up behind or under your PC case can obstruct airflow, potentially trapping heat and causing your components to run hotter. Tucking them away ensures your fans can do their job efficiently.
- Easier Cleaning and Maintenance: Dust loves to gather in a nest of cables. A clean setup makes it incredibly easy to dust and wipe down your desk and equipment. Swapping out a peripheral, like a new mouse or keyboard, becomes a simple task instead of a frustrating excavation.
The Essential Toolkit for Perfect Cable Management
You don’t need a professional workshop to achieve great results. Having a few of these inexpensive items on hand will make the process infinitely easier and give you a much cleaner finish.
- Velcro Straps (or Reusable Cable Ties): These are the number one tool for the job. They are reusable, gentle on your cables, and perfect for bundling groups of wires together. [Check Price for Velcro Straps on Amazon]
- Cable Sleeves: A cable sleeve is a fabric or plastic tube that wraps around a bundle of cables, hiding them in a single, neat-looking tube. It’s perfect for the main group of cables running from your PC to your monitor. [See This Zippered Cable Sleeve on Amazon]
- Under-Desk Cable Tray or Raceway: This is the secret weapon for a truly pro-level look. It’s a metal or plastic tray that mounts to the underside of your desk, giving you a perfect place to hide your power strip and all the bulky power bricks. [Get a Top-Rated Cable Tray on Amazon]
- Adhesive Cable Clips: These small clips stick to the back or underside of your desk and are perfect for guiding individual wires, like your mouse or keyboard cable, along a specific path. A [variety pack like this]
- A Good Power Strip: Choose a power strip with enough outlets for all your gear and preferably one with a flat plug and a long cord to give you more mounting flexibility.
The 7-Step Plan for Flawless Gaming Desk Cable Management
Alright, with your tools gathered, it’s time to get to work. Don’t rush this process. Set aside an hour or two, put on some music, and follow these steps methodically.
Step 1: The Teardown (Unplug Everything)
This is the most intimidating but necessary step. You can’t organize chaos; you have to start fresh. Unplug everything from the power strip and from your PC—monitors, peripherals, speakers, everything. Wipe down your desk and get a clean slate.
Step 2: The Foundation (Mount Your Power Strip)
Your power strip is the heart of your cable management. It should be completely hidden. Using an under-desk cable tray is the best method. Place the power strip inside the tray and mount it to the underside of your desk, usually towards the back. If you don’t have a tray, you can use heavy-duty double-sided tape or screws to mount the power strip directly to the back or bottom of your desk.
Step 3: Connect the Core Components
Start with the biggest and least-moved items. Plug your PC and your monitor(s) into the newly mounted power strip. Connect the display cable (HDMI or DisplayPort) between your PC and monitor. Let the excess cable hang for now.
Step 4: The Main Route (Group the Big Cables)
Identify the path these core cables will take. Usually, this is straight down from the back of the monitor to under the desk. Group these cables together. Use a Velcro strap near the monitor and another one near the PC to create a single, thick bundle. If you’re using a cable sleeve, now is the time to wrap it around this bundle.
Step 5: Tame the Peripherals
Now, one by one, plug in your peripherals: keyboard, mouse, microphone, webcam, etc. As you plug each one in, route its cable immediately. Use adhesive clips to guide the wire along the back edge of your desk to a central point before it drops down to the PC. This prevents a “spiderweb” of cables all over your desk surface.
Step 6: The Final Tuck (Hide Everything)
You now have one or two main bundles of cables dropping down from your desk. Plug everything into your PC. Take all the excess slack from every single cable and neatly coil it, securing each coil with a small Velcro strap. Place these coiled bundles into your under-desk cable tray or attach them to the underside of your desk. The goal is to have no cables touching the floor.
Step 7: The Test and Admire
Power everything on to make sure it all works. Sit back and admire your work. Your desk is clean, organized, and looks ten times better. The practice of gaming desk cable management is complete!
Conclusion: Maintaining Your Clean Setup
Congratulations! You’ve conquered the cable mess and created a setup worthy of your hardware. The best part is that maintenance is now a breeze. When you get a new piece of gear, simply un-do one Velcro strap, add the new cable to the bundle, and retighten.
Your journey to the perfect battle station is now one step closer to completion. With your desk organized, you can focus on the other elements that make a difference. For a complete overview of chairs, monitors, and more, be sure to check out our pillar guide on How to Create the Ultimate Gaming Setup.
Congratulations! You’ve conquered the cable mess… The process of great gaming desk cable management will make your setup look professional for years to come.