Finding the best bitrate for Twitch is one of the most confusing—and most important—steps for any new streamer. You can have the best microphone and the most entertaining personality, but if your stream is a pixelated, stuttering mess, viewers won’t stick around. It’s the technical foundation of a professional-looking broadcast.
Dialing in your bitrate is one of the most important technical steps, but it’s just one piece of the puzzle. If you’re looking for a complete, start-to-finish walkthrough of all the hardware and software you’ll need, be sure to read our ultimate guide on how to start streaming on Twitch.
You’ve probably heard the term “bitrate” thrown around in forums or other guides, but what does it actually mean? And how do you find the perfect number for your specific setup?
Don’t worry. This guide will break down everything in simple terms. We’ll show you how to find your ideal settings, explain the difference between encoders, and help you achieve that smooth, crisp stream you’re aiming for.
(This is a detailed guide on one part of streaming. For a complete overview, check out our ultimate guide to streaming on Twitch for beginners!)
Table of Contents
What is Bitrate and Why Does It Matter?
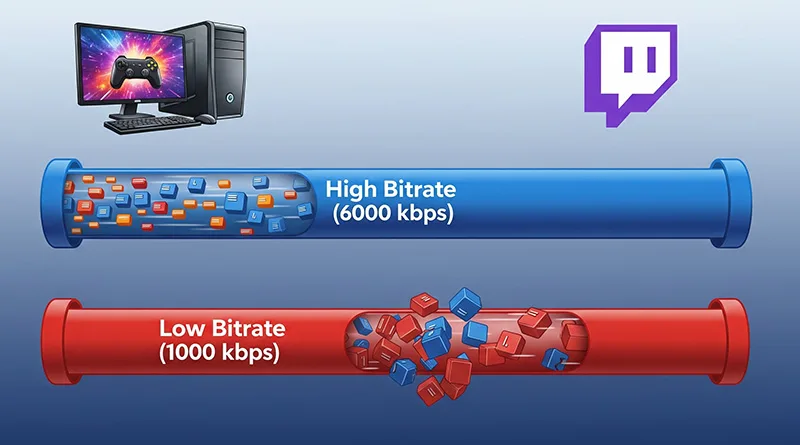
Think of your internet connection as a water pipe. The video data of your stream is the water flowing through it. In this analogy, bitrate is the pressure or speed at which you send that water.
- A low bitrate is like a weak trickle of water. It doesn’t use much of your internet’s capacity, but the resulting stream will be blocky, blurry, and low quality.
- A high bitrate is like a powerful jet of water. It sends much more data, resulting in a crisp, clear, high-definition stream for your viewers.
The goal is to find the highest bitrate your internet connection can handle without causing your stream to buffer or lag. The best bitrate for Twitch is a careful balance between quality and stability.
The #1 Factor: Your Upload Speed
Before you touch any settings in OBS or Streamlabs, you need to know your upload speed. This is the single most important factor. You can’t send data faster than your internet plan allows.
- Go to a website like Speedtest.net or fast.com.
- Run the test.
- Ignore the “Download” speed. The only number that matters here is your UPLOAD speed, measured in Mbps (megabits per second).
Golden Rule: You should never set your bitrate to more than 75-80% of your total upload speed. This leaves some headroom for your game, Discord, and other network activity. For example, if your upload speed is 10 Mbps, you should not set your bitrate higher than 8 Mbps (or 8000 kbps).
Finding the Best Bitrate for Twitch: Official Guidelines
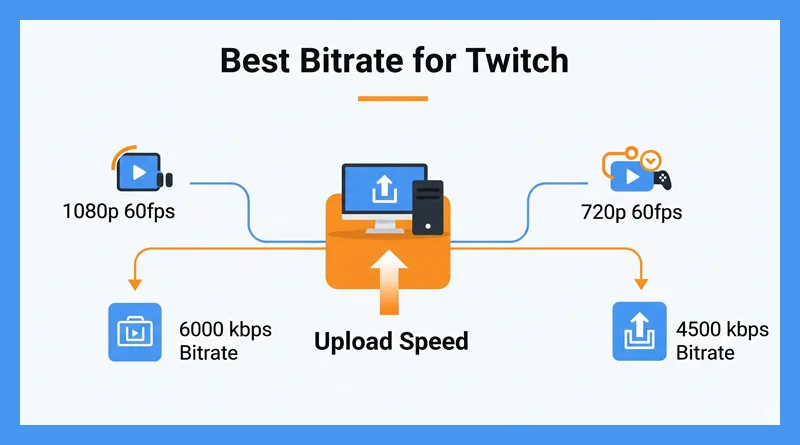
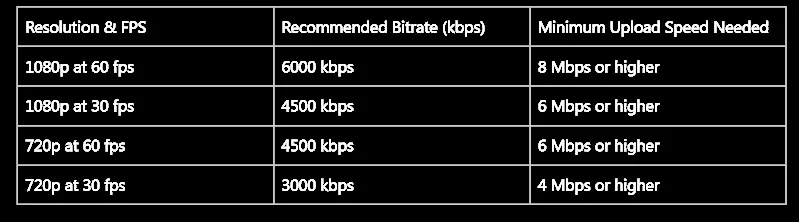
Twitch provides official recommendations for bitrate settings. For most new streamers, aiming for either 1080p or 720p is the sweet spot. Here is a simple chart to help you find the best bitrate for Twitch based on your goals.
| Resolution & FPS | Recommended Bitrate (kbps) | Minimum Upload Speed Needed |
| 1080p at 60 fps | 6000 kbps | 8 Mbps or higher |
| 1080p at 30 fps | 4500 kbps | 6 Mbps or higher |
| 720p at 60 fps | 4500 kbps | 6 Mbps or higher |
| 720p at 30 fps | 3000 kbps | 4 Mbps or higher |
(Note: 1 Mbps = 1000 kbps. So, 6000 kbps is 6 Mbps.)
For most streamers starting out, 720p at 60fps with a 4500 kbps bitrate is a fantastic target. It looks great on both mobile and desktop and is less demanding on your internet than 1080p.
The Great Encoder Debate: NVENC vs. x264
Inside your streaming software (like OBS), you’ll see an “Encoder” setting. This is the hardware or software that does the work of compressing your video to send to Twitch.
- x264 (CPU Encoding): This uses your computer’s main processor (CPU) to encode the video. It can produce very high quality, but it puts a heavy strain on your CPU. If your CPU is busy encoding your stream, it has fewer resources left to run your game, which can cause in-game stuttering or dropped frames.
- NVENC (GPU Encoding): This uses a dedicated encoding chip found on modern NVIDIA graphics cards (GTX 16-series and RTX series). It has a minimal impact on your gaming performance because the work is done by a separate part of the GPU.
For almost all gamers and streamers, NVENC is the better choice. It allows you to stream at high quality without sacrificing your in-game FPS. The only reason to use x264 is if you have a very powerful CPU (like a Ryzen 9 or Core i9) and an older graphics card.
Troubleshooting to Find the Best Bitrate for Twitch
What if you’ve set everything up and your stream is still laggy? Here are some quick fixes.
- Problem: Your stream is stuttering or disconnecting.
- Solution: Your bitrate is too high for your upload speed. Lower your bitrate in 250 kbps increments until the stream is stable.
- Problem: Your game is lagging, but the stream looks fine.
- Solution: Your encoder is overloading your system. If you are using x264, switch to NVENC. If you are already using NVENC, make sure your graphics card drivers are up to date.
- Problem: Your stream looks blurry or pixelated during fast motion.
- Solution: This is a sign your bitrate is too low for the resolution and framerate you’re trying to push. If your internet can handle it, increase your bitrate. If not, consider lowering your output resolution from 1080p to 720p. A sharp 720p stream looks much better than a blurry 1080p stream.
Conclusion: Quality and Stability are Key
Finding the best bitrate for Twitch isn’t about choosing the highest number; it’s about finding the highest number that your specific setup can reliably handle.
To recap:
- Test your upload speed. This is your hard limit.
- Choose a target resolution. 720p/60fps is a great starting point.
- Set your bitrate based on Twitch’s recommendations, ensuring it’s below 80% of your upload capacity.
- Use the NVENC encoder if you have a modern NVIDIA GPU.
By following these steps, you’ll be well on your way to a professional, stable, and high-quality stream that will keep your viewers happy.
What bitrate and settings are you using for your stream? Share your experience in the comments below!